
If you're a small business owner with a tight budget, you've probably thought about creating your own video content instead of hiring a professional. Maybe you've spent hours researching the latest cameras and lenses, trying to figure out what equipment you need to make it work. But here's a secret that professional videographers know: lighting matters more than your gear.
You don't need to spend thousands on a camera to create professional looking videos. You can actually just shoot on your smartphone with the right lighting setup and create footage that looks more professional than content shot on a $10,000 camera in poor light. With the right lighting setup, you can shoot compelling content that represents your business well and saves you money in the process.
Today, I want to share one of the most fundamental lighting techniques in videography: three-point lighting. Master this, and you'll transform your videos overnight.
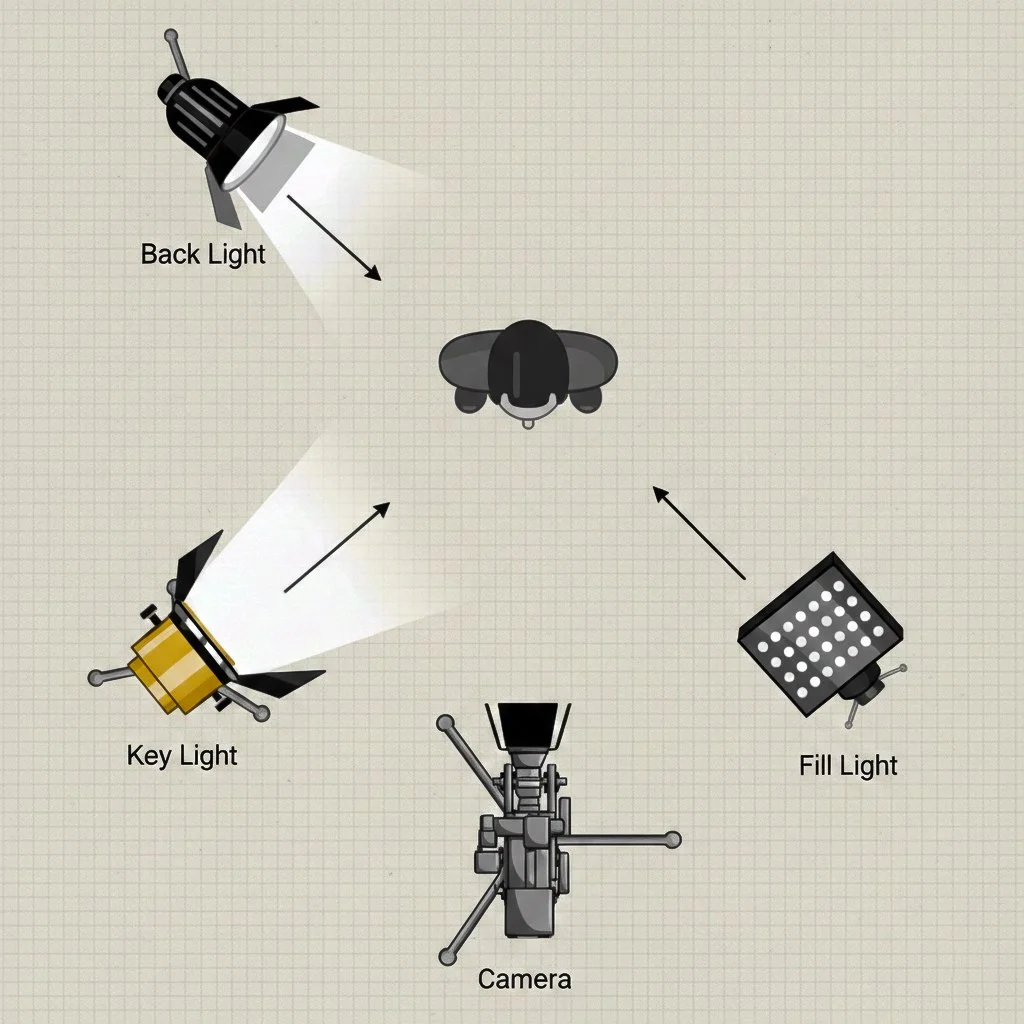
What Is Three-Point Lighting?

Three-point lighting is the foundation of professional video lighting. It uses three separate light sources positioned at specific angles to illuminate your subject in a way that looks natural, dimensional, and cinematic.
The beauty of this setup? You don't need expensive equipment. You can achieve professional results with affordable LED panels, work lights from the hardware store, or even desk lamps and natural light from windows.
The Three Lights Explained
1. The Key Light (Your Main Light Source)
This is your primary light and does most of the heavy lifting. Position it at a 45-degree angle to one side of your subject, slightly above eye level. This creates the main illumination on your subject's face while adding subtle shadows that give dimension.
The key light should be the brightest of your three lights. If you're working with limited equipment, this is the one light you absolutely need to get right.
2. The Fill Light (Softens the Shadows)
The fill light sits on the opposite side of the key light, also at about 45 degrees. Its job is to soften the shadows created by the key light without eliminating them completely. Those shadows are what give your subject depth and dimension.
The fill light should be less intense than your key light, typically about half the brightness. This maintains that professional, three-dimensional look rather than flat, overly bright footage.
You can use a white poster board or foam core as a reflector instead of an actual light. Position it opposite your key light to bounce light back onto the shadowed side of your subject's face.
3. The Back Light (Separates Your Subject)
Also called a rim light or hair light, this light sits behind your subject, positioned up high and angled down. It creates a subtle glow around the edges of your subject, separating them from the background.
This separation is what makes your footage look professional rather than homemade. Without it, your subject can blend into the background and look flat.
Why This Matters More Than Your Camera
Modern cameras, even smartphones, are incredibly capable in good lighting conditions. A three-year-old DSLR with proper lighting will outperform the latest cinema camera in poor light every single time.
Light is what the camera sensor captures. Give it plenty of quality light to work with, and even budget equipment can create stunning images. Starve it of light, and even the most expensive camera will struggle with noise, poor color, and lack of detail.
I've seen countless beginner videographers invest thousands in camera bodies and lenses, only to shoot in their dimly lit living room with just overhead lighting. The result? Flat, uninspiring footage. Meanwhile, someone who understands three-point lighting can shoot in their garage with $200 worth of hardware store lights and create footage that looks like it belongs in a commercial.
Getting Started: Your First Three-Point Setup
You don't need to spend a fortune to start using three-point lighting. For the key light, grab a basic LED panel or even a clamp work light with a daylight bulb from the hardware store. For the fill light, use another light source at half the intensity, or simply use a white foam board as a reflector. For the back light, a small LED panel, a desk lamp, or even a practical lamp that's already in the scene works great.
Position yourself or your subject, set up these three lights at the angles described, and watch your footage transform.
Practice Makes Perfect
Like any skill, three-point lighting takes practice. Start simple: set up your lights, shoot some test footage, and adjust. Move the lights closer or farther away. Change the angles slightly. Adjust the brightness. Pay attention to how small changes affect your image.
Remember, these aren't rigid rules. They're guidelines. Once you understand the principles, you can modify the setup to create different moods and styles. Want something dramatic? Move your fill light farther away or eliminate it entirely. Want soft and friendly? Bring your lights closer and use diffusion.
The Bottom Line
If you're creating video content and wondering where to invest your limited budget, start with lighting before upgrading your camera. Good lighting will elevate everything you shoot and teach you fundamentals that will serve you throughout your entire video journey.
Three-point lighting isn't just a technique. It's about understanding that great video is about controlling and shaping light, not just pointing a camera at something and hoping for the best. Master this foundation, and you'll be amazed at what you can create, regardless of your camera budget.
About the Author
Josh Soliven is a professional videographer based in Lakeland, Florida, specializing in brand videos, corporate events, and promotional content. After falling in love with videography in 2007, Josh spent over 17 years mastering the art of visual storytelling and cinematography before establishing ISO 24 Media in 2020.
ISO 24 Media serves clients across the United States who value quality storytelling and cinematic visuals. From event coverage and video marketing to professional lighting design and full service production, Josh combines technical expertise with creative vision to produce compelling content that connects with audiences.
Whether you're a small business, corporation, or entrepreneur looking for a skilled videographer, Josh travels nationwide to bring your vision to life. Specializing in commercial video production, brand storytelling, marketing videos, and business promotional content, ISO 24 Media is committed to helping you create video content that stands out.
Let's create something amazing together. Because great video starts with great light.